How To Page
Creating your own professional looking labels isn't rocket science but just like anything else, getting knowledge from someone who has experience with labels can make your job less time consuming, less wasteful and less aggravating. With that in mind, LaserInkjetLabels.com has compiled a list of some of the most asked "how do I ..." questions. Click on the link below for answers to each question.
How to...
Now go to the folder that you just saved it in and double left click on the file name. The template should open automatically in MicroSoft Word®. When Word opens you should see the labels as if they are on a sheet. If not, in the top toolbar locate Table and click it. Locate Show Gridlines and click that. You may have to expand the box to find this command. You should see the label outlines now. You may want to go under View in the top toolbox and click on Print Layout as it makes the page representation look more like a normal sheet of labels. Now you are ready to start entering your text and image. Word will treat each label it's own contained paragraph and will automatically do a carriage return when typing space on the line has run out. All the tools you use in writing a paragraph are functional meaning that you can use the format paragraph tool, change text direction, change text color and size, curve your text and insert images. When you are finished getting one label designed the way you want it, copy and paste it into all the other label cells one at a time. Now save the doc under different name so as not to overwrite the original template. Use one of our pdf files that you printed to scale for test printing the labels. Hold the test sheet up behind an actual label sheet to make sure it lines up properly prior to printing a label sheet. Prefer to watch a video tutorial? Click here: Video Tutorial on using templates. How to adjust a Word® template that is printing outside of labels.
Adjusting the template can be done by going into Tools then mouse over Letters and Mailings and click on Envelopes and Labels. Now click on the Labels tab. In the box look for rectangle entitled Options and click on that. The Label Options box will appear and then click on Details. A new box will pop up and look like the image to the right. If the printing is consistently off from top to bottom, them adjust the measurement in the Top Margin field. If the printing is consistently off from left to right, adjust the Side Margin. Click on OK and then click on OK again. Click on Print to test. Repeat the process until the printing is perfectly centered on the labels. If your labels are progressively getting worse as you look at the sheet from left to right and/or up and down, the vertical and/or horizontal pitch needs to be amended. You'll need to open the label options box as instructed in the paragraph above. If you need to adjust the labels left or right, amend the Horizontal Pitch by increasing or decreasing the number as needed. If the labels need adjusting up or down, then amend the Vertical Pitch by increasing or decreasing the number as needed. Click on OK and then click on OK again. Click on Print to test. Repeat the process until the printing is perfectly centered on the labels. Remember it is always a good idea to print off pdf templates for testing the alignment of the text to the labels so as not to waste labels sheets. How to download and use our Adobe® PDF Template.
Now go to the folder that you just saved it in (do you remember which one?) and double left click on the file name. The template should open automatically in Adobe Reader®. If not, you will need to download the program found here. You should now be looking at an exact replica of our label layout. From this point you can do a couple of different things with the file. We recommend printing a couple sheets out to use as practice. You should always test your work and the template dimensions on a test sheet prior to printing on the label sheets themselves. This way if the margins are off a smidgen or you don't like how your design looks, you haven't wasted a sheet of labels. Remember to print the pdf off to scale and to not reduce to fit the sheet. The printer will warn you that some of the print is outside of your printer's printable margin, but that is ok. Printing off the sheets this way is also a quick way to get samples of the label sizes without having to wait for them to mailed out to you. If you have a graphics program such as Illustrator®, PhotoShop® or and something equivalent, open the pdf in that program and use it as a template for your artwork. Don't forget to put the pdf on its' own layer apart from the artwork so that you can hide the lines prior to printing. How to get labels to feed properly through a printer without jamming.
Another good tip to try prior to placing the labels into the print tray is to fan the sheets. Grab the stack of label sheets in both hand and gently run your thumb down the thickness side of the label stack as you would a deck of playing cards. This will help prevent sheets from double feeding through the printer. Now you are ready to place the labels into the printer. If you have a copy machine are laser printer, always try to pick the tray that has the straightest path through the printer. The more rollers a sheet of label paper has to go through, the greater the odds of them eventually jamming. The last thing to do prior to actually printing the labels is to go to your printing settings. Click on Print from the file command of your program and the print box will pop up. No look for the button called Properties and click on it. Now look for the Paper/Quality tab and click on that. Inside that tab, look for the box with the heading "Paper Options". There should be a drop down box in there with the heading "Type is". Clicking on the drop down box should show you multiple options for paper types. Each printer manufacturer specifies their own paper options here so each one may be different, but look for "Labels". If "Labels is not present, then you might consider selecting "Card Stock" or "Transparencies". Each selection tells the printer how thick the material is for adjusting roller tension and in the case of most laser printers, how hot to make the printer head and how fast to move it through the machine. How to properly store labels.
How to choose between buying a laser or an inkjet printer.
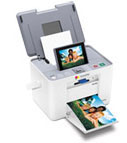
Determine your needs. Will this printer be in an office setting that will be printing lots of black copy all day long or is it for a small home office that is rarely used during the day? Desktop monochrome laser printers are best for printing lots of black text. They can print quickly and quietly and typically don't take up that much space. They have a large toner cartridge that makes this type of printing economical. While the initial cost of the printer can be more than double that of an inkjet printer, the long term cost will be substantially less than that of the inkjet printer. Of course the limitations on this printers is that is will only print using black toner. If you are in a home setting where you a few text documents during the day, but you also need to occasionally print in color, an inkjet printer would be your best choice. Color requirements. Will you be printing lots of color images such as brochures, product labels or photos? Will you be doing a lot of color photo printing or will the color just be for charts and graphs at meetings? If you are using high quality glossy paper for photo's you may consider going with an inkjet printer. Today's photo gloss inkjet papers are designed to absorb and trap inkjet inks, locking them in and preventing smudges. Many even have UV protection for archival quality. And don't worry about quality. Using the right inkjet printer with the right photo gloss paper will produce traditional photo printing quality. A good example of this is the Epson PictureMate® personal photo lab printer. This printer prints using 6 colors and at a print resolution of 5760 x 1440. One other thing that needs to be pointed out while we are on the subject of color printing. Consider the look you want for your finished product. If you are using a matte paper or label, there will not be much of a difference between the looks of colors laser printers and inkjet printers. But if you are using a gloss or even a colored paper, there could be a huge difference in the finished look. In the case of high gloss stock, inks from an inkjet printer will absorb, leaving a glossy finish. When a laser printer is used, the toner is basically fused on top of the gloss finish. This will end up giving the printed area more of matte finish which may not be as desirable to you. When printing on colored stock the opposite technology may be the better choice. Toner is more opaque than the inkjet inks so the color of the stock being printed will not discolor the image as it would if using an inkjet printer. Determine your budget and factor in initial costs as well as operating costs. As stated earlier, inks and toner can become very expensive. If you purchase a $50 inkjet printer but run 500 copies of black text a day, your monthly operating costs will far exceed that of the $600 monochrome laser printer. In this scenario the monochrome laser printer will be cheaper over the longer run and would have been a better choice based on your usage. Always look at the manufacturer's specifications for things like monthly duty cycle and estimated ink or toner usage. How to laminate a label using our laminating labels.
How to make sure your labels stick properly.
If you notice that you are not getting good adhesion, make sure the surface is smooth and free from oils, silicon and dust. (Keep in mind that some surfaces, particularly rubber, plastics and painted, are more likely to require materials other than standard, general purpose face and adhesives.) Use a dry, lint free rag to wipe the surface clean. If the surface is especially grimy, add some rubbing alcohol to the rag to clean the surface. If none of this helps, you may need to use a label that has an extra aggressive adhesive on it. Typically, laser and inkjet labels are not made using this type of adhesive, as it can ooze out of the sheet, onto your printer rollers and gum up the entire feeding components. Another option would be to go with a different sized label that would allow you to wrap the entire label around the surface so that the label overlaps itself by about a half inch. This lets the label adhere to itself, keeping the label in place. How to design and print labels if you don't have a graphics program.
How to know if your inkjet printer's inks are water-resistant.
If you have any doubt about a label sticking to your product, please contact us for a free sample using our Contact Us page.
|
|
 To download a template of one of our label sizes for use in MicroSoft Word®, go to our
  Ok, so you just did a test print and discovered that the printed labels do not match up perfectly on the labels. Time to trouble shoot! First thing you need to do is look for a pattern. Look to see if all the labels are off by the same amount or if the printing get progressively worse as it moves left to right or top to bottom. If the labels are consistently off by the same amount, all that needs to be done is to adjust the measurement for the top margin or side margin.