Canva makes it easy to add your own text, logos, images, colors, and other design elements to blank label templates. If you are using a LaserInkjetLabels.com PNG label template, the steps below will walk you through setting up the template in Canva, creating your label design, preparing the finished artwork, and printing it at the correct size.
Important: Our Canva templates are designed to help you position artwork on an 8.5" × 11" sheet of labels. The template acts as a visual placement guide while you design. Before downloading your finished artwork for printing, make sure the template guide itself is removed so the template lines do not print on your labels.
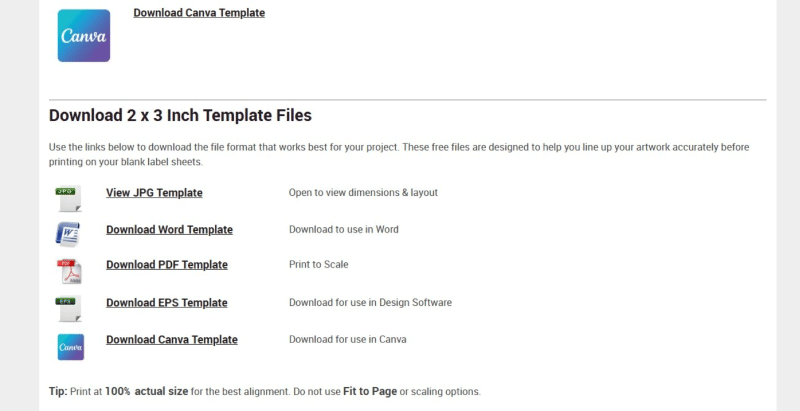
Download a LaserInkjetLabels.com label template before getting started.
Quick Overview: Using a Label Template in Canva
- Download the PNG template for your label size from LaserInkjetLabels.com.
- Open Canva and create a new design that is exactly 8.5" × 11".
- Upload the PNG label template to Canva.
- Place the template on the page and stretch it edge-to-edge.
- Add your text, logo, images, colors, and other design elements.
- Duplicate your finished label design into the other label positions on the sheet.
- Remove the PNG template guide before downloading your finished design.
- Download your artwork as a print-quality PDF.
- Print on 8.5" × 11" label sheets at 100% or Actual Size.
Step 1: Download the Correct Label Template
Start by finding the template that matches the exact label size and layout of the LaserInkjetLabels.com label sheets you purchased.
Visit our Label Templates page and locate your label size. When a Canva-compatible PNG template is available, download the PNG file and save it somewhere on your computer where you can easily find it, such as your Downloads folder or Desktop.
Make sure you select the correct template. Two label sheets can contain labels with the same dimensions but use different margins, spacing, or label counts. For the best alignment, always use the template provided for the specific LaserInkjetLabels.com product you are printing.
Step 2: Open Canva and Create an 8.5" × 11" Design
Once you have downloaded the template, open Canva in your web browser and sign in to your Canva account.
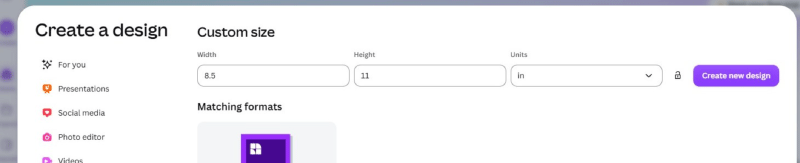
- Click Create.
- Select Custom size.
- Change the measurement unit to inches if necessary.
- Enter 8.5 for the width.
- Enter 11 for the height.
- Click Create new design.
Your new Canva document should now be a standard U.S. Letter-size page measuring exactly 8.5" wide × 11" high.
Do not begin with a flyer, poster, letterhead, or another Canva preset unless you have confirmed that it is exactly 8.5" × 11". Even a small difference in page size can cause your artwork to move out of alignment with the labels as the sheet prints.
Step 3: Upload the PNG Label Template
Next, upload the PNG template you downloaded from LaserInkjetLabels.com.
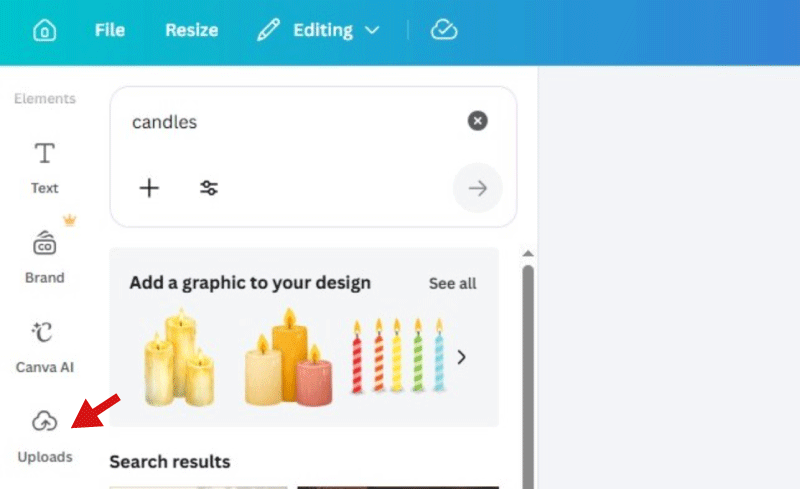
- In the Canva editor, select Uploads from the left-side menu.
- Click Upload files.
- Locate the PNG label template you previously downloaded.
- Select the file and allow Canva to upload it.
- Once the template appears in your uploads, click it to place it onto the Canva page.
The PNG template should now appear on top of your blank 8.5" × 11" page.
Step 4: Stretch the Template to the Full 8.5" × 11" Page
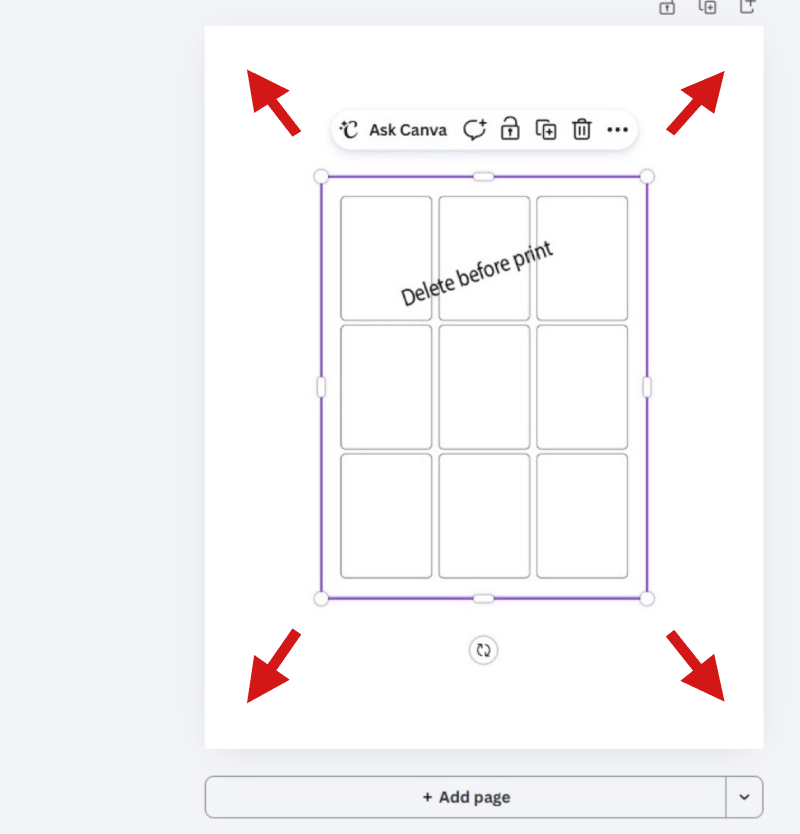
The uploaded PNG needs to fill the entire Canva page so the label outlines are positioned correctly.
Click the uploaded template image. Using the corner handles, enlarge the template until it reaches all four edges of the 8.5" × 11" Canva page.
The template should:
- Reach the left edge of the page.
- Reach the right edge of the page.
- Reach the top edge of the page.
- Reach the bottom edge of the page.
- Remain proportional without being stretched more in one direction than another.
Do not intentionally move the template inward to create extra margins. The margins and spacing shown in the LaserInkjetLabels.com template represent the actual placement of the labels on your sheet.
Step 5: Keep the Template in Place While You Design
Once the template is positioned correctly, avoid moving it while you work. The outlines on the template show you approximately where each physical label is located on the sheet.
If your version of Canva allows you to lock an element, you may want to lock the template image after positioning it. This can help prevent accidentally moving the template while you are adding text and graphics.
The template is only a positioning guide. Your actual design elements — such as text, logos, photographs, product names, ingredients, barcodes, or other artwork — should be positioned over the label areas shown on the template.
Step 6: Design Your First Label
Choose one label position on the sheet and create your first complete label design inside that area.
You can add:
- Business or product names
- Logos
- Text
- Product descriptions
- Ingredients
- Barcodes or QR codes
- Photos or illustrations
- Background colors
- Borders
- Shapes and design elements
Keep Important Content Away From the Label Edge
Although the template shows the approximate label boundary, it is a good idea to keep important content such as text, logos, barcodes, and faces slightly inside the label edge.
Printers and label sheets can have small mechanical tolerances during printing. Keeping important elements away from the very edge gives your design some room for minor movement and helps prevent text or logos from appearing too close to the edge of the finished label.
If your background color or image is intended to reach the edge of the label, you can extend that background slightly beyond the label outline. However, keep important text and graphics safely inside the label area.
Step 7: Duplicate the Design Across the Sheet
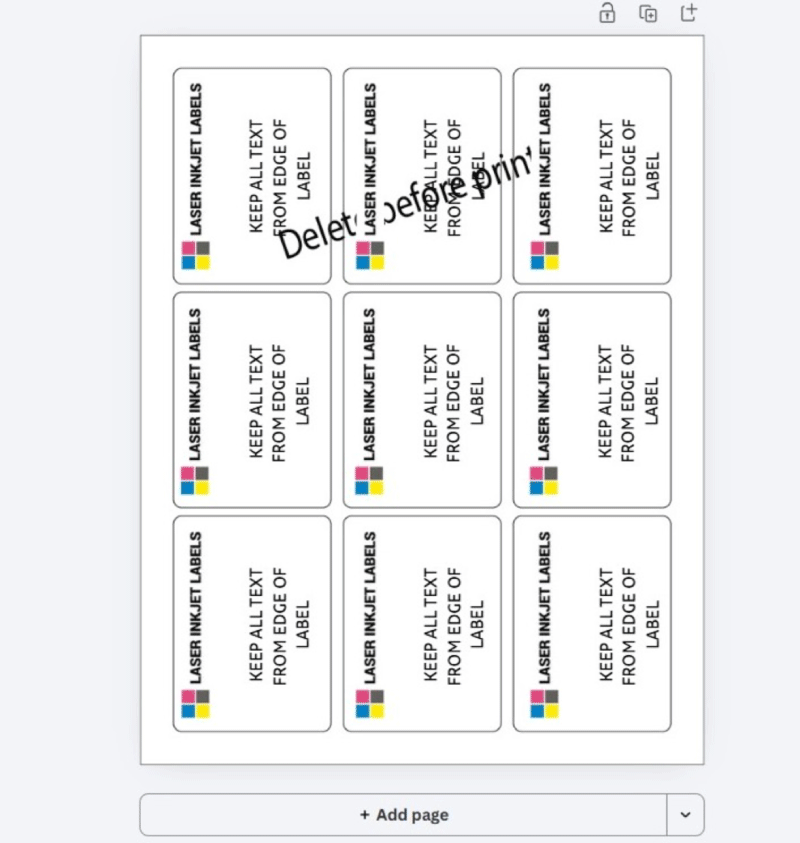
After your first label looks the way you want it, you can copy the design to the remaining label positions.
For designs made from several Canva elements, it can be helpful to select all of the elements that belong to the label and group them together. You can then copy and paste or duplicate the complete group.
Move each copy into the next label position using the PNG template as your guide.
Take your time during this step. Small positioning differences between copies may be visible when the sheet is printed.
Use Canva's Rulers and Guides for More Precise Placement
For additional positioning help on a desktop computer, Canva provides rulers and guides.
Depending on your current Canva interface, these can generally be found under:
File → Settings → Show rulers and guides
Guides can be useful when you need to keep repeated label designs lined up evenly across rows and columns.
Remember that the LaserInkjetLabels.com PNG template should remain your primary reference for the actual label positions.
Step 8: Review Every Label Before Removing the Template
Before removing your template guide, zoom in and review the entire sheet carefully.
Check that:
- Every label design is centered within its label outline.
- No text extends outside the label area.
- Logos and important graphics have enough space around the edges.
- Backgrounds that are intended to reach the label edge extend far enough.
- No design elements accidentally overlap neighboring labels.
- All repeated labels are positioned consistently.
- Spelling, phone numbers, website addresses, prices, ingredients, and other information are correct.
This is also a good time to save your Canva design before preparing the final print file.
Step 9: Remove the PNG Template Before Downloading
This step is very important.
The PNG template is intended only to help you position your artwork. If you leave the template visible when you download and print the finished design, the template outlines may print on your labels.
After you have finished positioning every label:
- Select the PNG template image.
- Delete it from the Canva page, or hide it if your Canva workspace provides that option.
- Confirm that only your finished label artwork remains.
- Review the entire sheet one more time.
Tip: Removing the template from the design should not move the artwork you have already created. If you are concerned about making changes, you can duplicate the Canva page or design before deleting the template so you retain a working version that still includes the positioning guide.
Step 10: Download Your Finished Label Design
When your design is complete and the template guide has been removed, download the finished artwork.
- Click Share.
- Select Download.
- Choose PDF Print as the file type.
- Make sure you are downloading the correct page or pages.
- Download the PDF to your computer.
Do Not Add Crop Marks to a Pre-Cut Label Sheet
When using a LaserInkjetLabels.com pre-cut 8.5" × 11" label sheet, you normally do not need Canva crop marks. The labels are already die-cut into the sheet.
Avoid selecting options that add crop marks or change the finished page dimensions unless you have a specific printing workflow that requires them.
Your finished PDF should remain a standard 8.5" × 11" U.S. Letter-size page.
Step 11: Print a Test on Plain Paper First
Before putting a full sheet of labels into your printer, we strongly recommend printing your finished PDF on an ordinary sheet of 8.5" × 11" copy paper.
After printing the test page:
- Place the printed test sheet on top of or behind an unused label sheet.
- Hold the two sheets up to a light or bright window.
- Compare the printed artwork with the actual label positions.
- Make sure the artwork is properly centered within the labels.
This simple test can help catch page-sizing, printer-scaling, or alignment problems before you use a sheet of labels.
Step 12: Print at 100% or Actual Size
Correct print scaling is one of the most important parts of printing sheet labels.
When you open your downloaded PDF and select Print, review the print settings before printing your label sheet.
Look for a setting such as:
- Actual Size
- 100% Scale
- Scale: 100%
Do not use settings such as:
- Fit to Page
- Fit
- Shrink Oversized Pages
- Scale to Fit
- Reduce to Printable Area
These settings can slightly resize the entire page. Even a small amount of scaling can cause the first few labels to appear correct while labels farther down the page gradually move out of alignment.
Also confirm that:
- The paper size is 8.5" × 11" or Letter.
- The page orientation matches the template.
- Your printer is using the appropriate paper or media setting for the label material you purchased.
- You are printing on the correct side of the label sheet.
Recommended Printer Settings for Label Sheets
Printer settings vary by printer manufacturer, model, label material, and printing method. Your printer may use different names for similar settings.
As a general starting point:
- Use Letter / 8.5" × 11" as the paper size.
- Print at 100% or Actual Size.
- Select the media or paper type recommended for the label material you are using.
- Use a high-quality print setting when printing photographs, detailed graphics, or small text.
- Make sure the label material is compatible with your printer technology.
Pro Tip: Test Your Alignment Without Wasting Label Sheets or Ink
Before printing your finished design on actual label sheets, print a few copies of the original PDF label template on ordinary 8.5" × 11" paper. You can use these printed templates as inexpensive test sheets while checking the alignment of your Canva design.
When printing test copies, consider selecting Grayscale, Draft, Fast Draft, or a similar low-ink print-quality setting if your printer offers one. This can help conserve color ink or toner while you fine-tune the alignment.
Most important: Do not scale the template or your finished Canva design when printing. Print at 100% or Actual Size. Settings such as Fit to Page, Scale to Fit, or Shrink to Printable Area can slightly resize the page and cause the artwork to fall out of alignment with the labels.
Once your plain-paper test lines up correctly with the PDF template, you can move on to printing on your actual label sheets.
If you purchased laser labels, use a laser printer. If you purchased inkjet labels, use an inkjet printer unless the specific material is listed as compatible with both technologies.
Printer manufacturers sometimes recommend different media settings for adhesive label sheets, so consult your printer documentation when necessary.
Troubleshooting Canva Label Printing
My Entire Design Is Too Small or Too Large
This is usually caused by page scaling during printing.
Check that your PDF is being printed at 100% or Actual Size. Turn off Fit to Page, Shrink to Fit, Scale to Fit, or similar automatic resizing options.
The First Row Is Close, but the Labels Get Farther Off Toward the Bottom
This is also commonly caused by print scaling. If the page is being reduced or enlarged even slightly, the alignment error becomes more noticeable farther down the sheet.
Confirm that:
- The Canva design is exactly 8.5" × 11".
- The downloaded PDF is 8.5" × 11".
- Your printer paper size is set to Letter.
- The PDF is being printed at 100% or Actual Size.
The Entire Sheet Prints Too Far Left, Right, Up, or Down
If the artwork remains consistently offset by approximately the same amount across the entire sheet, the issue may be related to the printer's paper feed or printable area rather than scaling.
First, run another plain-paper test. Make sure the paper guides in your printer tray are positioned snugly against the paper without bending it.
Some printers feed label sheets more accurately through a manual-feed or rear-feed tray. Check your printer manufacturer's instructions to determine the recommended paper path for labels or heavier media.
The Label Outlines Printed on My Labels
The PNG template was probably still visible when the finished artwork was downloaded.
Return to your Canva design, delete or hide the PNG template layer, download a new PDF, and print another plain-paper test.
My Design Moved When I Removed the Template
The template and your design elements may have been selected or grouped together. Undo the change, separate the template from your artwork, and then remove only the PNG template.
Creating a duplicate of the Canva design before removing the template is a useful way to preserve your editable working copy.
The Design Looks Blurry When Printed
Low-resolution logos, photos, or graphics can look acceptable on a computer screen but appear blurry when printed.
Whenever possible, start with high-quality source images and logos. Avoid enlarging a small image far beyond its original dimensions.
The Colors Look Different on Paper Than on My Screen
Some difference between screen colors and printed colors is normal. Computer monitors create color with light, while printers reproduce colors with ink or toner on a physical material.
The label material itself can also affect the finished appearance. For example, colors may appear different on matte paper, gloss material, brown kraft, or clear labels.
Tips for Getting the Best Results
- Always start with the correct template. Do not assume another template with the same label dimensions uses the same sheet layout.
- Create the Canva document at exactly 8.5" × 11".
- Do not resize the finished page during printing.
- Keep important text and logos away from label edges.
- Remove the PNG guide before downloading the finished design.
- Print a plain-paper test before using label sheets.
- Use the correct label material for your printer.
- Load sheets carefully and keep the printer guides snug against the sheet.
- Save your original Canva design. This makes it easy to update names, dates, prices, products, or other information later.
Frequently Asked Questions About Using Label Templates in Canva
Can I use LaserInkjetLabels.com templates in Canva?
Yes. When a PNG version of the template is available, you can upload it to an 8.5" × 11" Canva design and use it as a visual guide for positioning your label artwork.
What size should I make my Canva page?
For our standard sheet label templates, create a Canva design measuring exactly 8.5" wide × 11" high.
Why do I need a PNG template?
The PNG template provides a visual representation of the label positions, margins, and spacing on the physical label sheet. It allows you to create your artwork directly over those positions in Canva.
Should I leave the template visible when I print?
No. The template is a design guide only. Once your artwork is properly positioned, remove or hide the PNG template before downloading your finished print file.
What file type should I download from Canva for printing?
For most sheet-label printing, PDF Print is a good choice because it is designed to preserve high-quality artwork for printing.
Should I select crop marks and bleed in Canva?
Normally, no. LaserInkjetLabels.com sheet labels are already die-cut into the 8.5" × 11" sheet, so crop marks are not needed for ordinary sheet-label printing. Adding options that change the page dimensions can also interfere with alignment.
Why should I print at 100%?
The label template is designed around the exact position of labels on an 8.5" × 11" sheet. If your printer enlarges or reduces the page, the artwork may no longer line up with the die-cut labels.
Can I use the same Canva design again?
Yes. Save your Canva project and use it again whenever you need more labels. You can also duplicate the design before making changes so you keep an original version.
Can I print directly from Canva?
For LaserInkjetLabels.com sheet labels, we recommend downloading the finished design and printing the file using your own printer and its print settings. This gives you greater control over paper size, media type, print quality, and the important 100% / Actual Size scaling setting.
Find the Right Template for Your Labels
Ready to start designing? Visit our Label Templates page to find templates for many of our most popular blank sheet label sizes.
If you are still deciding which label size you need, visit our Label Size Guides for help choosing a size for bottles, jars, containers, packaging, barcodes, and other common applications.
Still having problems? Please email us using are Contact Us page.