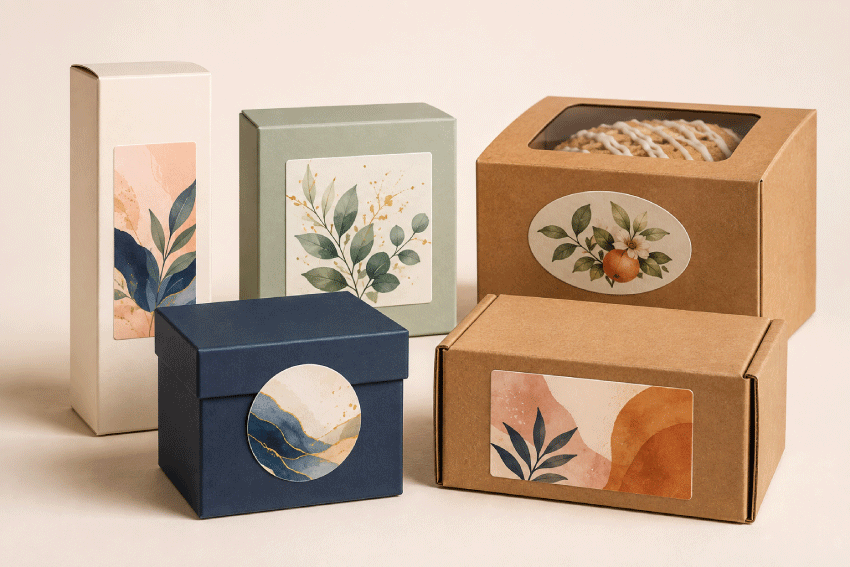
A well-sized label can turn a plain folding carton, gift box, bakery box or mailer into polished retail packaging. Boxes usually provide flatter labeling surfaces than bottles and jars, but the correct label size still depends on the usable panel—not simply the outside dimensions printed in the box supplier’s catalog.
Fold lines, lid overhangs, locking tabs, windows, seams, corrugation, textured coatings and opening flaps all reduce the area where a pressure-sensitive label can lie flat. A label that barely fits the full panel may bridge an edge, wrinkle when the box is opened or look off-center after the carton is assembled.
This guide explains how to measure an assembled product box, choose practical label sizes for common retail packages, plan front, top, side, back and sealing labels, and select paper or film materials for the way the package will actually be stored and handled.
LaserInkjetLabels.com offers blank labels on sheets and rolls for compatible inkjet and laser printers, plus custom printed labels for businesses that want finished labels ready to apply.
Quick Answer
The best label for a product box is slightly smaller than the flat, uninterrupted panel where it will be applied. Measure that panel after the box is folded and assembled, then leave a visible margin around the label. Do not include fold lines, lid lips, windows, slots, seams or areas that flex during opening.
| Product Box Type | Popular Label Starting Points | Typical Placement |
|---|---|---|
| Small jewelry, sample or accessory box | 1.5" × 3", 2" × 3" or 2.5" × 2" | Top, front or bottom |
| Cosmetic, skincare or candle carton | 2" × 3", 2" × 4" or 3" × 3" | Front, back or side panel |
| Food, bakery or confectionery box | 2" × 3", 3" × 3", 3" × 5" or 4" × 3" | Top, front or closure flap |
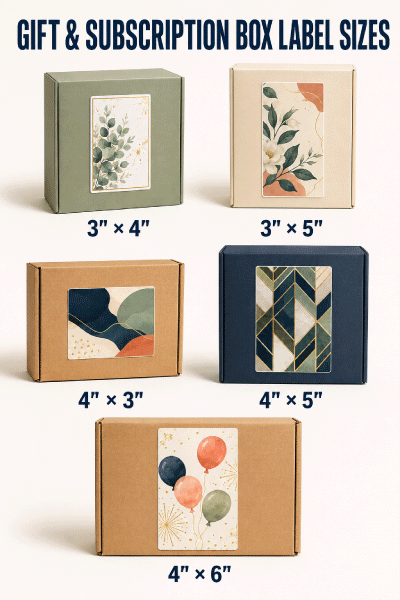
| Gift, kit or subscription box | 3" × 4", 3" × 5", 4" × 3", 4" × 5" or 4" × 6" | Lid, interior lid or side |
| Back information or barcode panel | 1.5" × 3", 2" × 3", 2" × 4" or 2.5" × 2" | Back, side or bottom |
Important: These sizes are practical starting points, not guaranteed fits. Always measure the actual production box, print the label outline at 100% scale and test it on an assembled package before ordering.
At-a-Glance Recommendations
| Best Everyday Material | White Uncoated or Semi-Gloss Paper for clean, dry boxes |
|---|---|
| Best Premium Appearance | Semi-Gloss, White High Gloss or a suitable clear material |
| Best Natural Appearance | Brown Kraft on compatible plain or kraft packaging |
| Best Moisture-Resistant Choice | White Matte BOPP, Glossy BOPP or compatible laser poly |
| Best General Shape | Rectangle with rounded corners |
| Best Centered Lid Shape | Square, circle or rectangle that leaves an even border |
| Best for Small Batches | Blank sheet labels |
| Best for Regular Production | Inkjet roll labels or custom printed labels |
Product Boxes Are Different from Shipping Boxes
A product-box label primarily identifies, explains and promotes the item inside. It may carry the brand, product name, variety, ingredients, instructions, warnings, barcode, lot code and retail information. Product cartons include folding paperboard boxes, rigid gift boxes, small corrugated mailers, bakery boxes, cosmetic cartons and subscription packaging.
A shipping label is designed for carrier routing and usually follows a separate size and layout. If a mailer box also travels through a parcel carrier, keep the decorative product label away from the shipping label, barcodes, box seams and any area that will be covered by tape. For carrier-label sizing, use the separate Shipping Boxes label-size guide.
Common Product Box Styles
| Box Style | Labeling Characteristics | Common Uses |
|---|---|---|
| Straight-Tuck Folding Carton | Flat front, back and side panels separated by folds; top and bottom flaps move during opening. | Cosmetics, candles, supplements, food and small retail products |
| Reverse-Tuck Carton | Similar usable panels, but top and bottom closures face opposite directions. | Personal care, medicine-style cartons, electronics and accessories |
| Rigid Two-Piece Box | Broad lid with an overhang; a top label usually offers strong presentation. | Jewelry, gifts, premium foods and specialty products |
| Mailer or Subscription Box | Large lid and side panels with folds, locking tabs and corrugated texture. | Kits, ecommerce products, samples and subscription orders |
| Bakery or Window Box | Top window, folded corners and closure tabs reduce the solid labeling area. | Cookies, pastries, candy and prepared foods |
| Sleeve or Belly-Band Carton | Outer sleeve slides over an inner tray, so labels must not block movement. | Soap, cosmetics, foods, gifts and small product sets |
| Pillow or Specialty Folding Box | Curved, flexing walls provide limited flat space. | Favors, jewelry, apparel accessories and lightweight gifts |
Choose the label location before finalizing the size. The same carton may accept a large front label, a compact side label or a centered lid label, but each placement has a different usable width and height.
How to Measure a Product Box for Labels
Measure a production sample that has been folded, filled and closed. Flat carton blanks can change slightly when assembled, and bowed panels or lid tension may reduce the area that stays perfectly flat.
- Assemble the box exactly as it will be presented to the customer.
- Choose the front, top, back, side, bottom or sealing location.
- Measure only the flat width between vertical folds, edges, windows, slots and seams.
- Measure only the flat height between horizontal folds, lid lips and closure areas.
- Subtract at least 1/8" from each side when space allows, creating a total label width and height smaller than the panel.
- For a centered label, compare the remaining margin on all four sides.
- For a label that crosses a lid and front flap, measure both surfaces and the fold, then test repeated opening.
- Mark the location of barcodes, required information, windows and package-opening instructions.
- Print the proposed outline at 100% actual size, cut it out and tape it to the assembled box.
- Open, close, stack and handle the package to confirm that the label stays flat and does not interfere with use.
Usable-panel formula: label width should be less than the flat panel width, and label height should be less than the flat panel height. A practical first test is panel width minus 1/4" and panel height minus 1/4", which leaves approximately 1/8" on each edge. Increase the margin when the box is handmade, corrugated, heavily textured or difficult to align consistently.

Allow a Border Around the Label
A label does not need to fill the complete panel to look intentional. A consistent border gives the design breathing room, makes application easier and prevents the adhesive edge from sitting directly on a box fold. Even a small alignment variation becomes obvious when an oversized label nearly touches all four edges.
For small retail cartons, approximately 1/8" of exposed box around the label is a useful starting point. Larger gift and mailer boxes may look better with 1/4", 1/2" or more. If the package itself is part of the color palette, a wider border can create a deliberate framed appearance.
Best Label Sizes for Small Product Boxes
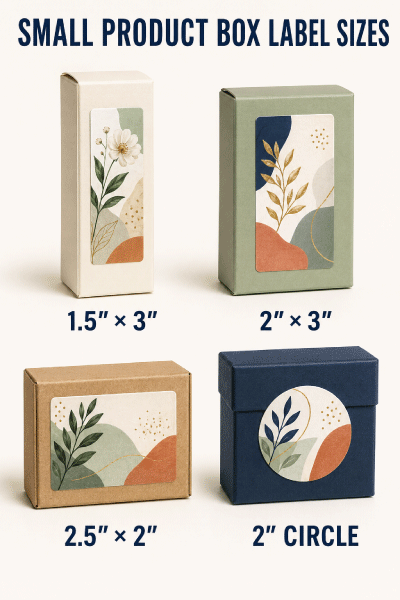
Small cartons and rigid boxes are used for jewelry, hardware, samples, craft products, electronics accessories, favors and specialty gifts. Their panels can be interrupted by lid overhangs or tucked flaps, so compact labels are often easier to center and apply.
Recommended starting points:
- 1.5" × 3" for narrow tops, fronts, bottoms or barcode panels
- 2" × 3" for compact front branding and product details
- 2.5" × 2" for short landscape panels
- 2" circle or 2.5" circle for a centered logo or box-top seal
When the top surface is smaller than the base, measure the lid rather than the nominal box footprint. If a rigid lid overlaps the lower section, keep the main label completely on the lid or completely on the base unless the label is intentionally designed as a tamper or closure seal.
Best Label Sizes for Cosmetic, Skincare and Candle Boxes
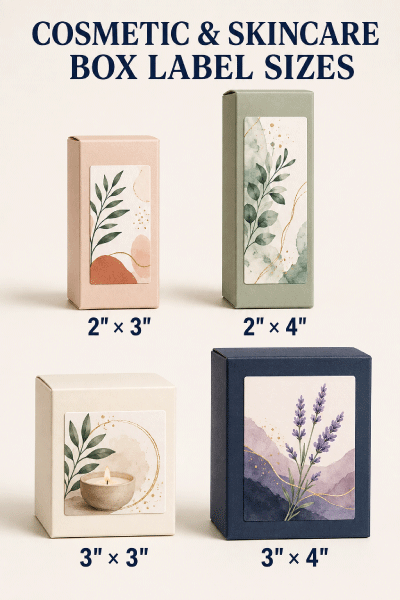
Cosmetic and personal-care cartons are frequently tall and narrow. The front label may prioritize the brand and product identity, while the side or back panel carries directions, ingredients, warnings, lot information and a barcode. Candle cartons may use a square or landscape label on the front and a second safety or scent label on another panel.
Recommended starting points:
- 2" × 3" for compact fronts and side information
- 2" × 4" for tall cartons with a narrow face
- 3" × 3" for square candle or skincare boxes
- 3" × 4" for larger front or back panels
Do not extend a label across a tuck flap simply to gain more printable space. The flap flexes whenever the package opens and can crease paper, loosen corners or tear the design. Use separate front and back labels when a single panel cannot hold the necessary copy comfortably.
Best Label Sizes for Food, Bakery and Confectionery Boxes
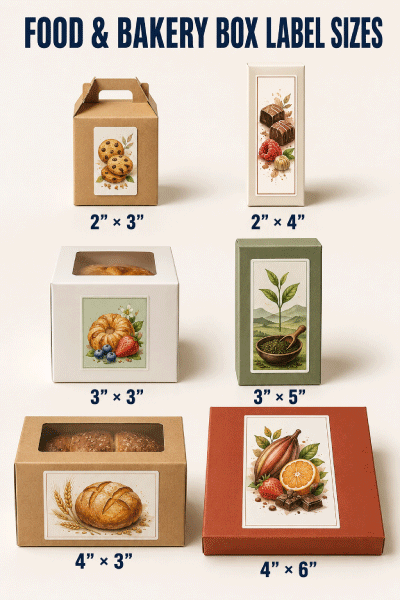
Bakery boxes, candy cartons, tea boxes and packaged-food cartons may require branding, ingredients, allergen statements, net quantity, business information, storage directions, lot codes and other information. A transparent window can increase shelf appeal but leaves less solid surface for an adhesive label.
Recommended starting points:
- 2" × 3" for small bakery, candy or sample boxes
- 2" × 4" for narrow fronts, ingredient panels or closure labels
- 3" × 3" for balanced branding on square packages
- 3" × 5" for larger top panels or detailed information
- 4" × 3" for landscape lids and box fronts
- 4" × 6" for large, flat food or bakery packages
Keep labels away from grease spots, flour dust, condensation and areas handled during packing. Apply labels only after the outside surface is clean and dry. If the package will be refrigerated or frozen, test the complete label construction on the actual box under the intended application and storage temperatures.
Best Label Sizes for Gift, Kit and Subscription Boxes
Gift and subscription boxes usually offer a broad lid that can support a larger brand label, promotional design or seasonal message. A second label inside the lid can provide instructions, a welcome message or a QR code without crowding the exterior.
Recommended starting points:
- 3" × 4" for medium lids and side panels
- 3" × 5" for landscape or portrait branding
- 4" × 3" for wide centered logos
- 4" × 5" for large brand and promotional panels
- 4" × 6" for large mailer-box lids with ample flat space
Corrugated mailer boxes may have a subtle flute pattern that shows through thin label materials. Test appearance and adhesion before committing to a large run. Rounded label corners can reduce snagging when boxes slide against one another during packing and shipping.
Front, Top, Back, Side, Bottom or Sealing Label?
| Label Placement | Best Uses | Primary Consideration |
|---|---|---|
| Front Label | Brand, product identity, variety and primary benefit. | Center within the face customers see first. |
| Top or Lid Label | Gift boxes, bakery boxes, kits and top-facing displays. | Leave an even border and avoid lid seams or windows. |
| Back Label | Directions, ingredients, warnings, contact details and barcodes. | Use readable type and preserve a flat scanning area. |
| Side Label | Flavor, scent, size, SKU, inventory or secondary information. | Make sure shelving and adjacent packages do not hide critical copy. |
| Bottom Label | Lot code, price, barcode or secondary information. | Check whether the surface is recessed, dusty or frequently abraded. |
| Closure or Seal Label | Bridging a lid and flap, tamper indication or decorative closure. | Test the fold, opening force and expected evidence after opening. |
Rectangles provide the most room for structured text. Squares create balanced front and lid designs. Circles work well for logos and decorative seals. Ovals can provide a softer traditional look. Standard rectangle, square, circle and oval shapes are usually easier to source, print and apply consistently than specialty die-cut shapes.

Using a Label as a Box Seal
A closure label can reinforce presentation and show whether a package has been opened, but ordinary branding labels are not automatically tamper-evident. Decide whether the label is decorative, functional or intended to provide visible opening evidence. When genuine tamper evidence is required, use a construction designed and tested for that purpose.
A seal that crosses a fold needs enough adhesive contact on both surfaces. Paper labels may crease or tear neatly when opened, while flexible films may stretch or remain intact. Test how the seal behaves on the actual coated, uncoated or corrugated box. Make sure it does not pull away printed graphics or damage a reusable package unless that result is acceptable.
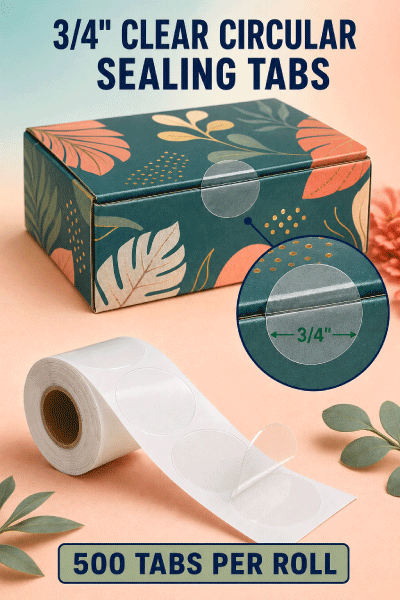
3/4" Clear Sealing Tabs
For a discreet closure that does not cover the box design, use 3/4" clear circular sealing tabs. These transparent tabs are supplied in rolls of 500 and can help hold small product cartons, bakery boxes, gift boxes, brochures and other folded packages closed while allowing the packaging color and artwork to remain visible.
Apply each tab so approximately half of the circle contacts each side of the closure. Test the tab on the production package to confirm adhesion, opening behavior and whether removal affects printed ink, paper fibers or specialty coatings. Clear sealing tabs provide a clean functional closure, but they should not be described as tamper-evident unless testing and the intended application support that claim.
Planning Space for Product Information
List all content before selecting a label. Depending on the product, the package may need a brand name, product identity, net quantity, ingredients, directions, warnings, manufacturer or distributor information, barcode, lot number, expiration date, recycling information or other statements.
A single oversized label is not always the best answer. A front label can remain clean and brand-focused while a back or side label holds detailed information. Small cartons can use a bottom label for a barcode or lot code. A second label also lets a business update variable information without redesigning the entire front panel.
Regulated products must follow the rules that apply to the product and market. Obtain qualified regulatory guidance for required copy, prominence, placement and minimum type size. This page is a practical label-sizing guide, not legal or regulatory advice.
Best Label Materials for Product Boxes
| Material | Recommended Use |
|---|---|
| White Uncoated Paper | Economical labels for clean, dry cartons, samples, inventory and short runs. |
| Semi-Gloss Paper | Retail boxes needing vivid color and a moderate sheen. |
| White High Gloss | Polished product packaging with bright graphics in appropriate dry conditions. |
| Brown Kraft | Natural, handmade and rustic packaging on compatible box surfaces. |
| White Matte BOPP | Moisture-resistant labels with a low-glare finish. |
| Glossy BOPP | Moisture-resistant labels with strong color and shine. |
| Clear Material | A no-label appearance that lets the box color or printed surface show through. |
| White Removable Paper | Temporary price, promotional or inventory labels when clean removal is important. |
| Laser Poly | Durable sheet labels for compatible laser printers and demanding handling. |
Match the label material to both the printer and the box. Inkjet and laser materials use different printable coatings. Coated cartons, soft-touch finishes, recycled paperboard, kraft stock and corrugated surfaces can produce different adhesive results, so request and test samples when the packaging changes.
Important: Clear material is not automatically waterproof. Clear describes appearance. Water resistance depends on the facestock, coating, adhesive, printed ink and exposure conditions.

Water-Resistant Film vs. Paper Labels
Most dry retail cartons perform well with paper labels. Film becomes more useful when a box may encounter refrigeration, condensation, oily handling, wet packing areas, frequent wiping or outdoor exposure. Remember that the box itself may fail before the label does, so the package and label must be evaluated as a complete system.
| Storage or Handling Condition | Recommended Starting Material |
|---|---|
| Dry indoor retail carton | White uncoated, semi-gloss, high-gloss or kraft paper |
| Premium gift packaging | Semi-gloss, high-gloss, kraft or a compatible clear material |
| Refrigerated or condensation-prone box | White Matte BOPP, Glossy BOPP or compatible laser poly |
| Oily or frequently handled package | Film construction tested for the expected exposure |
| Temporary promotional or price label | White removable paper tested for clean removal |
| Clear no-label appearance | Compatible clear material with printing and durability tested separately |
Apply pressure-sensitive labels to clean, dry boxes at the recommended temperature. Paper dust, flour, grease, release coatings and condensation can prevent full adhesive contact. Give the adhesive time to build its bond before chilling, stacking or shipping the package.

Sheet Labels vs. Roll Labels
Both formats work well on product boxes. Choose according to the printer, number of designs, production volume and application method.
| Sheet Labels | Roll Labels |
|---|---|
| Convenient for prototypes, seasonal products and short batches. | Efficient for regular production and growing order volume. |
| Designed for compatible desktop inkjet or laser printers. | Designed for compatible dedicated roll-fed label printers. |
| Easy to print several designs or quantities as needed. | Supports continuous printing and faster handling. |
| Flexible for hand application to different box panels. | Across-roll and into-roll dimensions must match the printer or applicator. |
| Useful for testing a new package before scaling. | Well suited to manual, semi-automatic or automatic application when configured correctly. |
If labels will be machine applied, confirm unwind direction, copy position, core size, outside roll diameter, gap and sensing requirements. Square and rectangular labels may need a specific feed orientation even when the numeric width and height appear interchangeable.

Common Product Box Label Mistakes
- Choosing a label from the outside box dimensions instead of the usable panel.
- Measuring a flat carton blank rather than an assembled, filled package.
- Making the label exactly equal to the panel and leaving no alignment margin.
- Allowing the adhesive edge to sit directly on a fold or corner.
- Covering a window, closure slot, locking tab or opening instruction.
- Placing a large label across a flap that flexes whenever the box opens.
- Using a tall or rigid label on a curved pillow box or bowed panel.
- Applying labels over paper dust, flour, grease, condensation or a low-adhesion coating.
- Assuming recycled kraft, glossy paperboard and soft-touch cartons need the same adhesive.
- Using paper where refrigeration, moisture or repeated wiping calls for a tested film.
- Assuming a clear label is automatically waterproof.
- Putting a barcode too close to a fold, seam or corrugated ridge.
- Ordering roll labels without confirming feed orientation and roll specifications.
- Skipping a full-size paper fit test and material adhesion test.
Product Box Label Buying Checklist
Before ordering, confirm:
- The exact box supplier, style, board material, coating and assembled dimensions.
- The selected front, top, back, side, bottom or sealing location.
- The flat usable width and height between every fold, edge, window and closure.
- The border that should remain visible around the label.
- Whether the label crosses a fold or must remain on one panel.
- The complete list of branding, product, barcode and required information.
- Whether one label or a front-and-back system produces a cleaner layout.
- The storage temperature and expected exposure to moisture, oil and abrasion.
- The correct material for the intended inkjet or laser printer.
- Whether the label will be applied by hand or with an applicator.
- The unwind direction, core, outside diameter and gap for roll labels.
- A successful full-size fit test and material adhesion test on the production box.
Related Label Size Guides and Packaging Pages
- What Size Label for Shipping Boxes?
- What Size Label for Soap Packaging?
- What Size Label for Coffee Bags?
- What Size Label for Wax Melts?
- What Size Label for Supplement Bottles?
- Packaging Labels for Boxes, Bags and Retail Products
Shop Blank Labels for Product Boxes
Choose blank sheet or roll labels in the size, finish and material that fits your box, printer and production process. Request samples when testing a new coating, recycled board or corrugated surface.
Browse Blank Sheet Labels Browse Blank Roll Labels Custom Printed Labels Shop Waterproof Labels
Frequently Asked Questions About Product Box Labels
What is the best label size for a product box?
The best size fits completely within the chosen flat panel and leaves a visible margin around every edge. Common starting points range from 1.5" × 3" on small cartons to 4" × 6" on large gift or subscription boxes.
How do I measure a box for a label?
Assemble the box, choose the label location and measure the flat width and height between folds, edges, windows, slots and closures. Subtract clearance before choosing the label size.
How much space should I leave around a box label?
Approximately 1/8" per side is a practical first test for many small cartons. Larger boxes may look better and be easier to label with 1/4", 1/2" or more.
Should I measure the carton before or after folding it?
Measure the assembled production box. Folding, filling and closing can slightly change the usable panel and reveal bowed areas that were not obvious on the flat blank.
Can a label go across a box fold?
It can when intentionally used as a seal, but the label should be tested through repeated opening and closing. For ordinary branding, keeping the label on one flat panel usually gives a cleaner result.
What size label works on a small retail carton?
Common starting points include 1.5" × 3", 2" × 3" and 2.5" × 2". The final choice depends on the actual flat panel and the amount of information in the design.
What size label works on a cosmetic box?
Many cosmetic and skincare cartons can use 2" × 3", 2" × 4", 3" × 3" or 3" × 4" labels. Tall, narrow cartons often benefit from a portrait label.
What size label works on a bakery box?
Popular starting points include 2" × 3", 3" × 3", 3" × 5", 4" × 3" and 4" × 6". Measure the solid area around any window and closure tabs.
What size label works on a subscription box?
Medium and large mailer-box lids often support 3" × 4", 3" × 5", 4" × 3", 4" × 5" or 4" × 6" labels. Keep decorative labels separate from carrier labels and packing tape.
Should the label go on the top or front of a box?
Use the panel customers see first. Top labels work well on bakery, gift and subscription boxes, while front labels are usually stronger for shelf-facing retail cartons.
Can I use separate front and back labels?
Yes. A front label can focus on branding, while a back or side label carries ingredients, directions, warnings, contact information and a barcode.
Can a regular label be used as a tamper-evident seal?
A standard label can close a box but is not automatically tamper-evident. Use and test a construction specifically designed to provide the required opening evidence.
What material is best for kraft boxes?
White paper creates contrast, while brown kraft can support a natural appearance. Because recycled and kraft surfaces vary, test adhesive contact and print appearance on the actual box.
What material is best for glossy or coated cartons?
Semi-gloss, high-gloss, clear or film labels can complement coated cartons, but surface treatments differ. Test the adhesive on the exact production coating before ordering.
Do product box labels need to be waterproof?
Most dry indoor cartons can use paper. A water-resistant film is a better starting point for refrigeration, condensation, wet packing areas, oily handling or frequent wiping.
Are clear box labels waterproof?
Not automatically. Clear describes appearance, not durability. Verify the label material, coating, adhesive and printed ink for the expected exposure.
Can removable labels be used on product boxes?
Yes, for temporary price, promotion or inventory information when clean removal is important. Test first because removable adhesive can still affect delicate printing, soft-touch coatings or recycled paperboard.
Can I print product box labels with an inkjet printer?
Yes. Choose sheet or roll material specifically compatible with the exact inkjet printer, then follow the recommended print quality and drying settings.
Can I print product box labels with a laser printer?
Yes, when the sheet material is rated for laser printing and the sheet format is compatible with the printer. Do not run inkjet-only material through a laser printer.
Should I buy product box labels on sheets or rolls?
Sheets are convenient for prototypes, seasonal designs and short batches. Rolls are efficient for repeated production, dedicated roll printers and compatible label applicators.
Does label orientation matter on rolls?
Yes. Across-roll and into-roll dimensions, copy position and unwind direction must match the printer or applicator. Confirm the complete roll configuration before ordering.
Where should a barcode go on a product box?
Place it on a flat, smooth panel with enough quiet space and contrast for reliable scanning. Avoid folds, seams, corners, windows, strong corrugation and reflective glare.
How should I test a product box label before ordering?
Print the design at 100% size on paper, cut it out and test the fit on an assembled box. Then apply a material sample and evaluate alignment, adhesion, opening, stacking, moisture, abrasion and barcode scanning.

