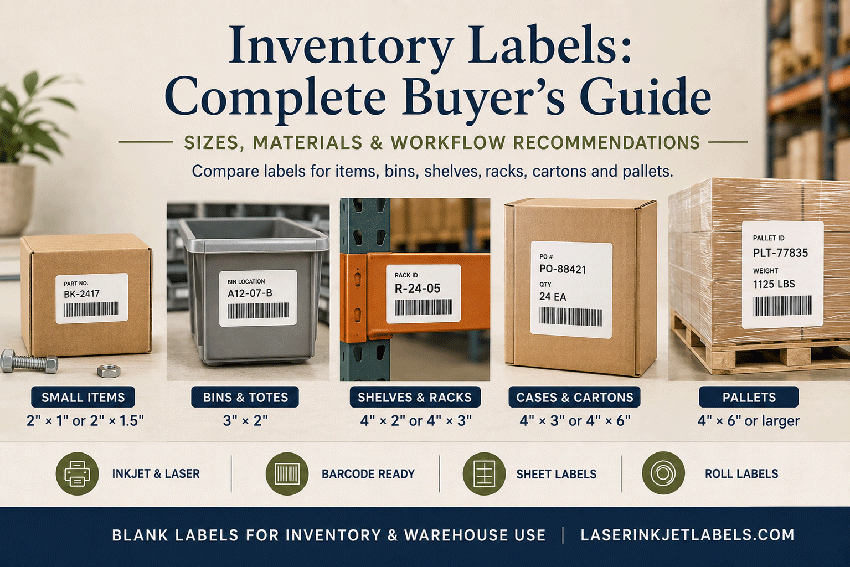
Inventory labels help warehouses, stockrooms, manufacturers, retailers and small businesses identify products, storage locations, assets and shipping units. The right label must fit the available surface, hold the required barcode and human-readable information, remain visible at the intended scanning distance and adhere throughout its useful life.
This guide compares practical inventory-label sizes for small items, bins, shelves, rack beams, cartons and pallets. It also explains barcode planning, label layouts, materials, printer compatibility and the differences between blank sheet labels and blank roll labels.
LaserInkjetLabels.com manufactures blank labels for compatible inkjet and laser printers in sizes and materials suited to inventory identification, warehouse locations, product tracking and variable-data printing.
Quick Answer
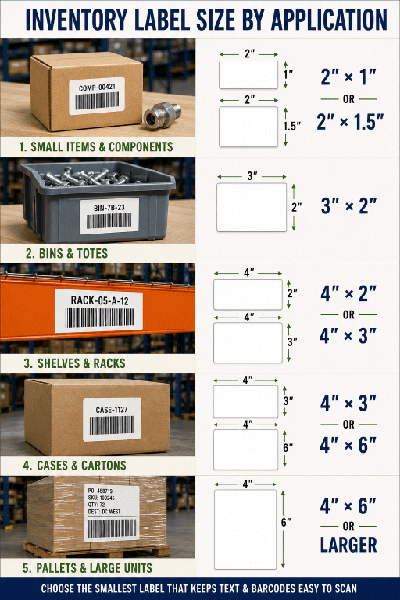
For compact products and components, start with 2" × 1" or 2" × 1.5". Use 3" × 2" for inventory bins, 4" × 2" or 4" × 3" for shelf and rack locations, and 4" × 6" for large cartons, pallets or labels that must be read from farther away.
| Inventory Application | Practical Starting Sizes | Primary Consideration |
|---|---|---|
| Small item or component | 2" × 1" or 2" × 1.5" | Short item number, SKU or compact barcode |
| Inventory bin or tote | 3" × 2" | Barcode plus bold human-readable location |
| Shelf or rack beam | 4" × 2" or 4" × 3" | Visibility and scanning distance from the aisle |
| Case or carton | 4" × 3" or 4" × 6" | Product, quantity, lot and logistics information |
| Pallet or long-distance location | 4" × 6" or larger tested format | Scanner range, installation height and viewing distance |
These sizes are practical starting points, not universal standards. Generate the final barcode with the exact data, print it at 100% scale, apply it to the actual surface and test it with the scanners and software used in production.
At-a-Glance Recommendations
| Best General Shape | Rectangle for linear barcodes; square or rectangle for 2D codes |
|---|---|
| Best Color Combination | Dark print on a clean, light, non-patterned background |
| Best Everyday Material | White Uncoated Paper |
| Best Durable Choice | Printer-compatible white poly or BOPP material |
| Best for Temporary Identification | White Removable Paper tested on the actual surface |
| Best for Desktop Printers | Blank Sheet Labels |
| Best for Recurring Production | Blank Roll Labels for compatible roll-fed inkjet or laser printers |
| Most Important Quality Check | Scan the final printed and applied label in the real operating environment |
Common Inventory Label Applications and Sizes
“Inventory label” can describe a small SKU label on a component, a removable label on a reusable tote, a large location label on a rack beam or a logistics label on a pallet. Choose the size from the information, scanning distance and application surface—not from the barcode alone.
| Application | Common Information | Suggested Starting Size |
|---|---|---|
| Individual item | SKU, item number, short barcode | 2" × 1" |
| Component or part | Part number, revision, lot or serial number | 2" × 1.5" |
| Inventory bin | Bin location, item family and barcode | 3" × 2" |
| Shelf edge | Aisle, bay, level and position | 4" × 2" |
| Rack beam | Large location code and barcode | 4" × 3" |
| Case or carton | Product, quantity, lot, date and logistics code | 4" × 3" or 4" × 6" |
| Pallet | Large logistics barcode, destination and handling information | 4" × 6" or larger tested format |
| Reusable tote or container | Container ID, route or temporary contents | 3" × 2" or 4" × 3" |
How to Plan and Measure an Inventory Label
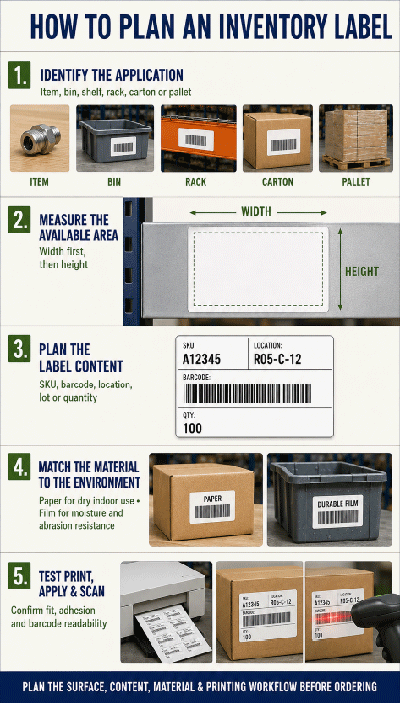
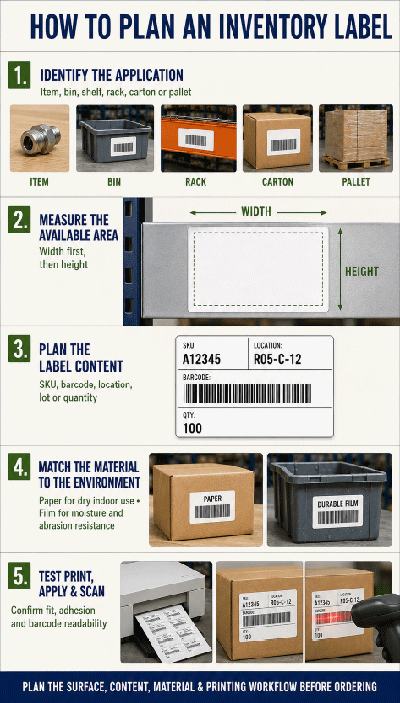
Plan the label around the complete workflow. A barcode that fits on a computer screen may fail after printing if it is reduced, distorted, placed too close to the label edge or applied to a curved, ridged or reflective surface.
- Identify the application. Determine whether the label identifies an item, location, container, carton, asset or pallet.
- Confirm the required barcode. Use the symbology and data structure required by your inventory system, retailer, customer or trading partner.
- Generate the final barcode. Placeholder data may produce a different width or density than the production code.
- Measure the complete symbol. Include required quiet zones and human-readable information.
- Add supporting content. Allow room for the SKU, item name, location, lot, date, quantity or instructions.
- Add label-edge margins. Keep printed content away from the physical edge to allow for printing and application variation.
- Measure the usable surface. Avoid seams, curves, ridges, handles, windows, fasteners and areas likely to be covered.
- Print and test at 100%. Scan the final label after application using the actual equipment and operating distance.
Best Inventory Label Sizes by Application
Small Items and Components
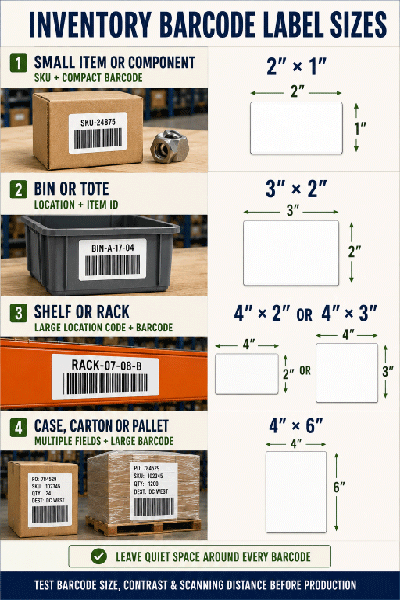
Compact inventory labels normally need a short item number, SKU, part number or barcode. A 2" × 1" label can work for concise data, while 2" × 1.5" provides additional height for a product name, lot, serial number or second line of text.
- 2" × 1" – compact SKU or asset label
- 2" × 1.5" – barcode with additional item information
Inventory Bins and Reusable Totes
A 3" × 2" label is a useful starting point for bins and totes because it can hold a barcode plus a bold location or item identifier. Use removable material when the contents change frequently and clean removal is important.
- 3" × 2" – bin, tote and small location label
Shelves and Rack Beams
Shelf and rack labels must remain readable from the aisle and may be scanned from farther away than product labels. 4" × 2" works well for a wide linear barcode and bold location. Use 4" × 3" when more vertical space or additional fields are needed.
Cases, Cartons and Pallets
Carton and pallet labels may include product identification, quantity, lot, date, destination and logistics barcodes. Start with 4" × 3" for a roomy case label or 4" × 6" when the label must contain multiple fields or scan from a greater distance.
How to Format a Warehouse Location Label
A location label must communicate the same information to the scanner and the worker. Keep the human-readable location large enough to identify from the aisle even when scanning is unavailable.
- Place the aisle, bay, level and position in a consistent order.
- Use large, high-contrast human-readable characters.
- Keep text, borders and graphics outside barcode quiet zones.
- Use one primary barcode when possible to reduce scan ambiguity.
- Print the exact encoded value in readable text below or beside the barcode.
- Use arrows or directional indicators only when their meaning is consistent throughout the facility.
- Install every label in the same relative position on bins, shelves and rack beams.
- Test at the expected viewing distance, angle and lighting level.
Barcode Types Used for Inventory Labels
| Barcode Type | Common Inventory Use | Planning Consideration |
|---|---|---|
| Code 128 | SKUs, assets, parts, work orders and internal locations | Symbol width changes with the number and type of encoded characters |
| GS1-128 | Cases, pallets and structured logistics data | Application Identifiers and trading-partner requirements control the format |
| UPC-A or EAN-13 | Retail products and point-of-sale identification | GS1 dimensional and quiet-zone requirements apply |
| QR Code | Item records, instructions, web links and mobile workflows | Data density, module size, scanning distance and four-module quiet zone matter |
| Data Matrix | Small parts, components and compact industrial identification | Printer resolution and scanner capability control minimum size |
Do not select a barcode type solely because it fits a preferred label. The required symbology comes from the system, retailer, customer, carrier or standard that will read the code. For more detailed barcode sizing information, see What Size Label for Barcodes?
Best Materials for Inventory Labels
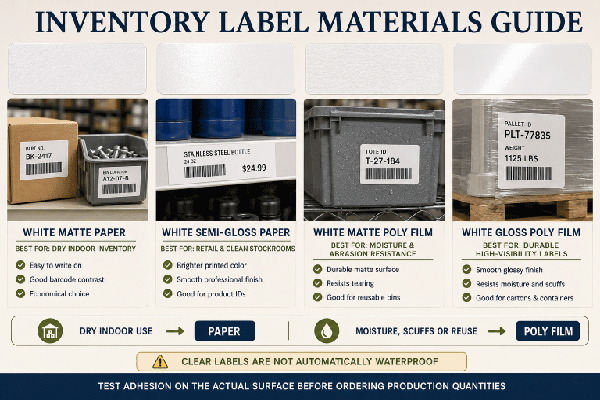
Inventory labels may remain indoors on clean cartons, move repeatedly through a warehouse or face moisture, abrasion, wiping and temperature changes. Choose the material and adhesive for the actual surface, printer and operating environment.
| Material | Recommended Inventory Use |
|---|---|
| White Uncoated Paper | Economical indoor items, cartons, shelves and short-term inventory labels |
| Premium White Matte Paper | Sharper presentation and detailed product-identification printing |
| White Semi-Gloss Paper | Retail inventory labels needing color with a smooth surface |
| White Removable Paper | Temporary prices, routing, contents and reusable-bin identification |
| Fluorescent Paper | High-visibility shelf marking, warnings and exception identification |
| Printer-Compatible White Poly or BOPP | Moisture, abrasion, refrigeration or demanding handling conditions |
White material generally provides the safest starting point for barcode contrast. Clear material can work only when the surface underneath remains light and consistent, and clear labels should not be assumed to be waterproof. Gloss, reflections, patterns, dark packaging and textured surfaces can reduce readability and should be tested with the actual scanners.
Permanent or Removable Inventory Labels?
| Permanent Adhesive | Removable Adhesive |
|---|---|
| Long-term item, asset and fixed-location identification | Temporary contents, pricing, routing and work-in-process labels |
| Cartons and packages that should retain identification | Reusable bins, totes and containers whose assignments change |
| Best when removal is not expected | Designed for cleaner removal when tested on the surface |
| Still requires surface and environmental testing | May not remain suitable for every temperature or storage period |
Always test the adhesive on the exact plastic, metal, painted surface, corrugated board or other substrate. Surface coatings, texture, dust, oil, temperature and label dwell time can change adhesion and removability.
Sheet Labels or Roll Labels for Inventory?
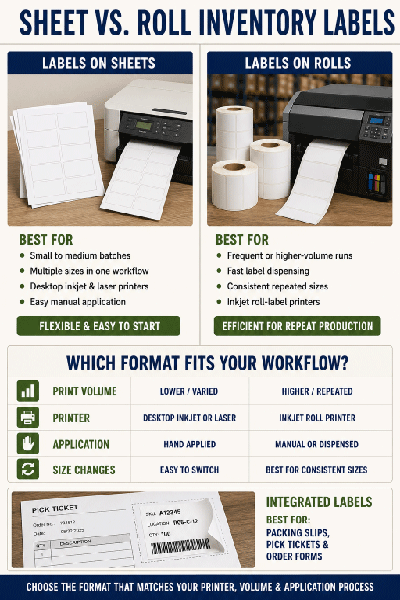
The format should match the printer, volume, software and application method. Desktop users commonly choose sheet labels, while recurring production may use roll labels in compatible roll-fed inkjet or laser label printers.
| Sheet Labels | Roll Labels |
|---|---|
| Designed for compatible desktop inkjet and laser printers | Designed for compatible dedicated roll-fed inkjet or laser printers |
| Convenient for prototypes, small batches and occasional printing | Efficient for recurring production and variable-data workflows |
| Easy to print several SKUs or locations as needed | Continuous supply reduces sheet handling |
| Flexible for hand application to items, shelves and bins | Can support manual or configured automated application |
| Sheet layout and template must match the product | Width, gap, core, outside diameter and unwind must match the equipment |
Browse blank sheet labels, blank roll labels and continuous inkjet roll labels for compatible inventory-printing workflows.
How to Apply Inventory Labels
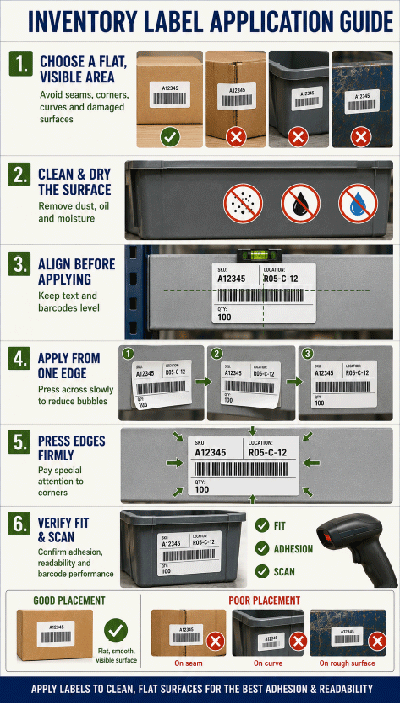
- Clean and dry the application surface.
- Remove dust, oil, condensation and loose corrugated fibers.
- Apply the label to a smooth, flat area away from seams, edges and fasteners.
- Keep the barcode parallel to the expected scanning motion when the workflow requires it.
- Press from the center outward so every edge and corner adheres.
- Use a positioning standard so workers place labels consistently.
- Scan the applied label before releasing the item, bin or location into service.
- Document replacement procedures for damaged, outdated or unreadable labels.
Inventory Data and Printing Best Practices
- Use one authoritative data source for SKUs, locations, lots and serial numbers.
- Prevent duplicate serial numbers and skipped variable-data records.
- Confirm that the printed human-readable value matches the encoded barcode value.
- Use consistent naming conventions for aisles, bays, levels and positions.
- Print at 100% scale unless the verified label software specifies otherwise.
- Maintain enough contrast between the barcode and label background.
- Test labels with all scanners, not only one device at a desk.
- Include normal warehouse lighting, distance, angle and motion in testing.
- Keep a documented process for replacing damaged and obsolete labels.
- Archive the template, barcode settings and data-field mapping used in production.
Common Inventory Label Mistakes
- Choosing the label before confirming the barcode type and actual encoded data.
- Reducing or stretching a barcode to force it into a preferred size.
- Placing text, borders or graphics inside required barcode quiet zones.
- Using a label too small for the required scanning distance.
- Applying labels over seams, ridges, curves, dust, oil or condensation.
- Using low-contrast clear, dark, patterned or reflective backgrounds without testing.
- Printing inkjet material in a laser printer, or laser-only material in an inkjet printer.
- Using permanent adhesive on reusable containers that require frequent relabeling.
- Encoding one value while printing a different human-readable value.
- Failing to test the final applied label with production scanners and software.
- Allowing old and replacement barcodes to remain visible at the same location.
- Ordering roll labels without confirming width, core, outside diameter and unwind.
Buying Tips
Before ordering inventory labels, confirm:
- The item, location, container or logistics unit being identified.
- The barcode symbology, encoded data and applicable requirements.
- The complete printed layout, including text and quiet zones.
- The scanning distance, angle, lighting and scanner type.
- The flat usable width and height on the application surface.
- The printer type, resolution and supported materials.
- The need for permanent or removable adhesive.
- Exposure to moisture, abrasion, refrigeration, wiping or outdoor conditions.
- Whether sheet or roll format best fits the volume and workflow.
- The exact sheet layout or roll configuration required by the printer.
- How variable data will be controlled and verified.
- Whether samples should be tested before a production order.
Related Label Guides and Resources
- What Size Label for Barcodes?
- What Size Label for Shipping Boxes?
- Packaging Labels for Boxes, Bags and Retail Products
- Blank Labels on Sheets
- Blank Labels on Rolls
- Continuous Inkjet Roll Labels
- Labels for Small Businesses
Shop Blank Inventory Labels
Print item numbers, SKUs, locations, barcodes, lots and variable inventory data in-house with blank labels for compatible inkjet and laser printers. Choose the size, material, adhesive and format for the actual surface and operating environment.
Frequently Asked Questions About Inventory Labels
What are inventory labels?
Inventory labels identify products, parts, assets, storage locations, bins, shelves, cartons or pallets. They may contain human-readable text, barcodes, QR Codes, lot numbers, serial numbers and other tracking information.
What size should an inventory label be?
The size depends on the application, information and scanning distance. Practical starting points include 2" × 1" for small items, 3" × 2" for bins, 4" × 2" or 4" × 3" for shelves and racks, and 4" × 6" for large cartons and pallets.
What size label works for an inventory bin?
A 3" × 2" label is a useful starting point for an inventory bin because it provides room for a barcode and a bold human-readable item or location identifier.
What size label works for a warehouse shelf?
Use 4" × 2" for a wide shelf-edge barcode and location, or 4" × 3" when more height, larger text or additional fields are needed.
What size label works for a pallet?
A 4" × 6" label is a practical starting point for many pallets and large logistics units. The final size must support the required barcode, data and scanning distance.
What barcode is best for inventory labels?
Code 128 is commonly used for internal SKUs, assets and locations. GS1-128 may be required for structured logistics data, while UPC or EAN codes are used on many retail products. The inventory system or trading partner should determine the required symbology.
Can I use QR Codes for inventory?
Yes. QR Codes can connect items or locations to records, instructions or web-based workflows. Preserve the required quiet zone and test the final printed code with the intended devices and scanning distance.
What information should an inventory label include?
It may include an item name, SKU, barcode, location, quantity, lot, serial number, date or status. Include only the information needed by the operating workflow and keep barcode quiet zones clear.
Should inventory labels use permanent or removable adhesive?
Use permanent adhesive for long-term item, asset and fixed-location identification. Use removable labels for temporary prices, routes, contents or reusable bins whose assignments change. Test both options on the actual surface.
What material is best for warehouse labels?
White uncoated paper works well for economical dry indoor applications. Use a compatible white poly or BOPP material when labels may encounter moisture, abrasion, refrigeration or demanding handling.
Are inventory labels waterproof?
Standard paper inventory labels are not waterproof. Durable printer-compatible white film materials can provide improved moisture and abrasion resistance. Clear labels should not be assumed to be waterproof.
Can inventory labels be printed with an inkjet printer?
Yes. Choose sheet or roll labels specifically compatible with inkjet printing and confirm that the printer can produce the barcode resolution and contrast required by the workflow.
Can inventory labels be printed with a laser printer?
Yes. Use laser-compatible material designed for the heat and printing process of a laser printer.
Should I use sheet or roll inventory labels?
Use sheets for compatible desktop inkjet or laser printers, prototypes and smaller batches. Use rolls for compatible dedicated roll-fed inkjet or laser printers and recurring variable-data production.
Can I print variable inventory data on blank labels?
Yes. Barcode and label software can merge item numbers, locations, serial numbers and other variable information onto blank sheet or roll labels. Maintain controls that prevent duplicate, skipped or mismatched records.
How large should a warehouse location barcode be?
The size depends on the symbology, encoded data, printer resolution, scanner and scanning distance. Larger labels such as 4" × 2", 4" × 3" or 4" × 6" provide room for larger barcodes and location text, but the final applied label must be tested.
Where should inventory labels be placed?
Place them on a clean, smooth and visible surface away from seams, edges, curves, ridges, fasteners and areas likely to be covered or damaged. Use the same placement convention throughout the operation.
Can inventory labels be applied to plastic totes?
Yes, but plastic formulation, texture, mold-release residue, temperature and cleaning can affect adhesion. Test the selected permanent or removable material on the exact tote before ordering production quantities.
How do I know whether an inventory barcode will scan?
Generate the final barcode using the real data, print it at the intended size and resolution, apply it to the actual surface, and scan it with every production scanner under normal lighting, distance and handling conditions.
Can I request samples before ordering inventory labels?
Yes. Samples help confirm size, material, printer compatibility, adhesive performance, removability and barcode readability on the actual item, bin, shelf or carton.

