 We’ve all heard the phrase, “a picture is worth a thousand words.” Nowhere is this more important than when you are trying to sell products online. It’s hard enough just to get people to your site to see your products, so when they do get there, why not show them the best possible images of your products. You don’t need to hire a professional photographer or marketing firm to accomplish it either. Here’s how to create your own White Box and produce your own professional looking product images.
What you’ll need:
- Cardboard Box
- Box Cutter
- Tape Measure
- 2 Small Lamps
- White Pillow Case or Bed Linen
- White or Colored Poster Board
The first thing you will want to do is decide on the size of the area you will need to hold and photograph your products. You’ll need to know the Length, Width and Height of the products you want to photograph. Once you have know this (or at least the average L x W x H of your products) you can start building the frame of the White Box. I always like to go a little bigger than product I am photographing so that I have more room to play with. You can always crop your photo’s later. At the same time, I always worry about space and storage requirements for when I’m done so I try not to go to big. I recently purchased a new inkjet printer and I find that this box will work perfectly for my my needs and the best part is that I won’t have to spend any extra money. Look around and see if you have any cardboard boxes that will fit your needs. Assuming that you found a box that will fit your needs, we can now move on to the cutting stage. What we are looking for here is to create a box with 4 openings, the two sides for the lights to shine through, the top and the front face opening for viewing the product. You’ll want to create an open frame on the 2 sides, the top and the front by cutting the centers out. Starting with the top left end of any one of three sides you will cut, make a mark about an inch or two in from the edges of all four corners. Use your box cutting tool and score the cardboard from point to point. The center should now be cut out and can be thrown away. Repeat this process for the others sides as well as the and front. Cuts do not need to be precise, so you don’t have to measure or use a straight edge to mark the lines unless you feel more comfortable doing it that way.
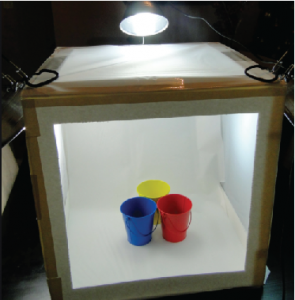
Now you should have a box that looks like this. Next, insert your white or colored poster board to the interior of the box. Tape the poster board near the top of the box. Let the paper lay naturally and then push the front edge back but do not create a crease. You are looking to end up with a gentle curve in the back corner and a flat surface for the products to sit. The poster board can be white or any color that you think helps make your product stand out best. Feel free to experiment with different colors.
Once the poster board is in place, take your white linen and drape it over the top and the left and right sides. You’ll want to keep the front open, as this opening that you will take the pictures through.
Finally, place one of the lamps on the left side and on on the right side of the box so that the bulb is pointing toward the middle of the box. I prefer to use a 40 watt frosted bulbs in lamps that have a back shade that directs the light in one direction. Be sure that the bulb is not touching the linen, as this could start a fire.
Now turn on your lamps, place your product on the poster board and start taking those pictures. If you frame your shots well, you won’t even have to crop your images. It’s a good thing to experiment with different style and wattage light bulbs to get the exact look you are going for. Good luck and happy shooting!